Tuesday, August 28, 2012

The Insanity of Wither Tracings

Insanity: doing the same thing over and over again and expecting different results.
~ Albert Einstein
As I soldier on in my search for a side saddle, I decided to revisit the whole wither tracing thing.  I was going to send a tracing off to another source.  I reached into my closet and pulled out the two cardboard cutouts, carefully labeled with the date.  I straightened the little stack, held them up in front of me and was immediately dissatisfied with their differences.  I decided I would make yet another tracing, but as I tried to go to sleep that night, my thoughts were plagued with the difficulties on making an accurate tracing.  What I really wanted, instead of a wire, was a tool like a profile gage that woodworkers use.  But on a grander scale.
When I finally gave up trying to sleep, I logged onto Facebook early in the morning and posed the question to the Side Saddle community., in one form or another "What do you use to make a wither tracing with?"  In the end, I gave up trying to find a 24" wide contour gage, decided to give up on my collection of wires, and I found a 36" artist's curve to order from the internet.  It arrived yesterday and today, after my ride, I spent at least half an hour laboring over a fresh wither tracing.  My stepfather wandered into the barn and together we checked this cutout from every angle.  His verdict "They can't say you didn't try."

So, here is the step by step process of how I took the most accurate wither tracing I could muster.


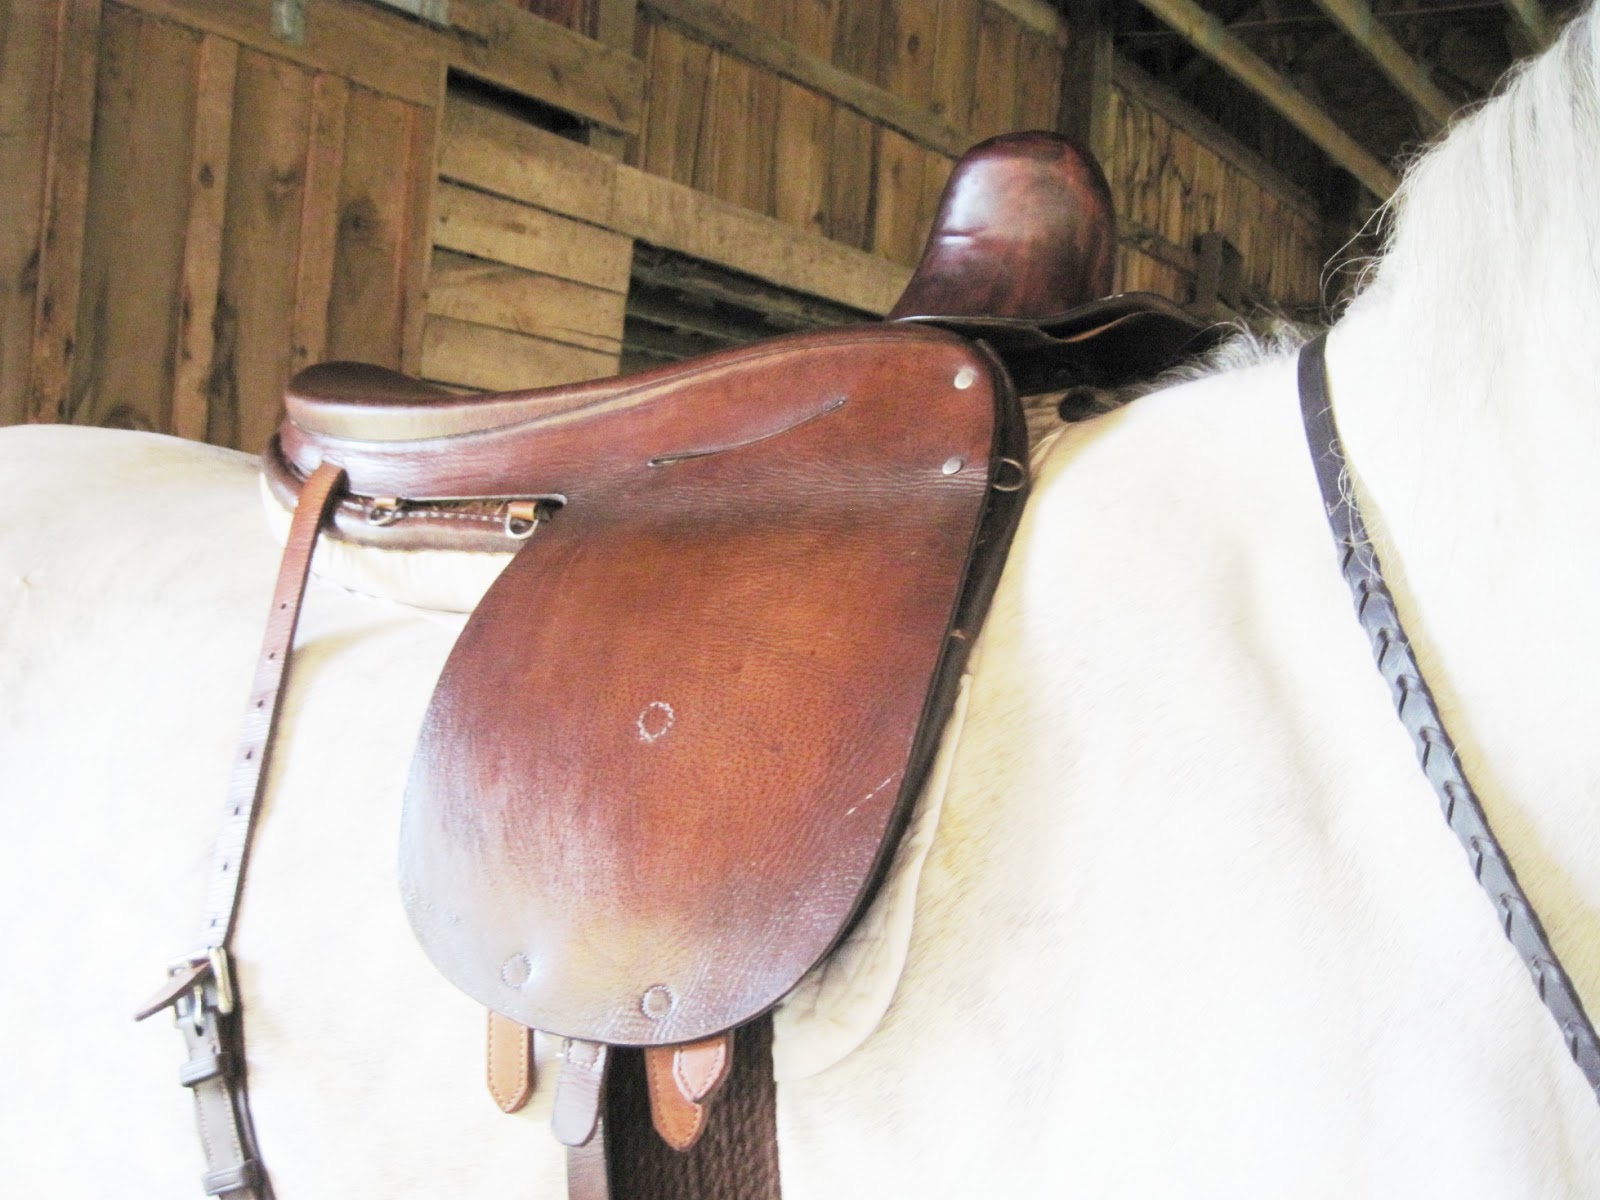
This is my Stubben Siegfried which fits us both well.  I rode for quite awhile in order to leave a sweat mark of the tree in the proper place for reference purposes.


The proper place for a saddle to sit, is two fingers behind the shoulder blade.

Normally, you would want a helper to lift and extend the horse's front leg so you could see where the Shoulder Blade travels when the horse is in motion.  Because I have just ridden in this saddle, I know that there were at least two fingers width between the blade and the saddle tree at all times.  Here you can see that the shoulder is up against my ring finger, and the sweat mark is to the right of my index finger.

I place my artist's curve (centered) over the withers at the front of the sweat mark.  Notice the girth mark also gives me a reference point.

Now the TRICKY part.  Unless its 10 below and the plastic is cold and rigid, the curve (or wire) is very likely to sag between the horse and the cardboard no matter how careful you are.  See how this curve has closed?  It is important to have the cardboard set up as close to the horse as possible.

Secondly, you want to trace on the correct side of the curve.  This is the WRONG side.

This is the correct side.  Have someone help to hold the curve firmly in place and be careful not to push it with your pen.

Now, cut the shape out of the cardboard and label the Near and Off sides.


And the FRUSTRATING part.  Put the negative space back on the horse to see if it fits.

You may have another go at placing a freshly measured curve against your cut out.  Starting small makes sense because we can continue to whittle away until it fits.

William got used to wearing the cardboard.  You will note that as the horse moves, and the muscles expand and contract, the shape will fit differently.

20 minutes and many shards of cardboard later, the curve is beginning to fit down on the horse properly.

Make sure the board is upright and level across the top.  Check both sides to see that the curve follows the sweat mark down the side.  Identify tight spots and remove them with your scissors.

See the difference between my initial best effort at tracing and the final "verified" shape?  This is due to the curve (or wire) sagging and closing the angle at the withers.  If you didn't verify that the cut out fits, you would be sending erroneous information to your saddle seller, and we all know the old saying "garbage in garbage out".

Now, find some light weight kraft paper to trace the shape onto.  Do not trace the removed peice of cardboard.  Trace the one you tried on the horse.  Label the Near and Off sides clearly and write your name, contact info and date.  Be sure to write all this info on the INSIDE of the curve so that when the shape is cut out to compare to the saddle, the info is not on the scrap.

Here is my short stack of wither tracings.

My most recent tracing, which I sent to Linda Flemmer for the Mayhew, fits fairly well.  It is an advantage to work with a base line tracing that you have compared to an actual saddle and seen where the fit challenges are with that saddle so you can become familiar with your horse's shape.

With the last tracing and today's tracing superimposed on each other, you can see that they are very similar.  I now feel comfortable mailing this tracing off to match against the next candidate.

Friday, August 24, 2012

Points to Ponder: Hankerchief Slits


Some side saddles have a handkerchief slit cut into the off side flap.  This has often perplexed me as I have never seen a photo or drawing of a handkerchief here, nor is it addressed in any of the rules of appointments.


It was suggested the other day on the Facebook group, that it would have been inappropriate (un-ladylike) while out hunting, to holler Tally-Ho! when you viewed the fox, and that a lady should wave her hanky.  Now this actually makes sense for more than one reason.  While out hunting, it is often frowned upon to "Halloa" or "Tally-Ho" because this distraction will not only startle the fox, but lift the heads of the hounds.  Fox hounds are scent hounds, not sight hounds.  If they lift their heads they may lose the scent, and the fox may now be out of sight and lost for good. 

On the occasions when it is inadvisable to holler, a gentleman should indicate a sighting of the fox by facing his horse in that direction and removing his hat, hold it outstretched in the direction the fox has gone.  Now suppose you are a lady out hunting in the early 20th century, and you have your hat pinned to your hair, or better yet, secured with a veil which covers the entire face and is snugged up under your chin.  How do you signal?  It makes sense that you might pull your hanky from your saddle and use that instead of your hat.


And this brings up another question.  If you were wearing a veil, what other use would you have for a hanky?  Is it possible, or even advisable, to blow your nose through a hunting veil? 

These are the things that keep me up at night.

Tuesday, August 21, 2012

Measuring Up


Well, the saddle is back at the Side Saddlery today, and I admit I miss her.  She is a lovely saddle, and such a perfect fit for me.  Some tall curvy lady out there is going to have a really really nice saddle.  Unfortunately, the verdict was that it just wasn't going to fit Mr W. Grey.  We gave it a thorough analysis.   I sent photos to Linda and she and I discussed some options.  She suggested I also consult with Sue Tobin from Side Saddle Heaven.  After much debate, I made the hard decision to return this saddle and keep on looking.


As part of my decision making process, I made a measured tracing of this tree.  Unlike my Martin and Martin, the tree of the Mayhew is easily visible between the padding and the safe.


I have highlighted it here in red.


First I pressed my wither tracing against it to see how the curves match.  That is difficult to show in a photo, but easy in this case in real life.  The near side point seemed to overlap the cutout in a bad way. Particularly the last inch.  This is supported with what I felt when running my hand along the front, and down around the point while mounted.

Snug, but not bad here

Uncomfortably snug, and going down around the point was unconfortable even to knuckles.


I decided to try my hand at Sue's method of overlapping tracings.  Armed with a 36" wire, a measuring tape, a cloth tape, a good deal of patience, and a little artistic talent, I made what I felt to be an accurate representation of the shape of the tree.  Then I superimposed my wither tracing onto it.


 I played with it for awhile, sliding it about


I measured and placed the Dees on the tracing, then consulted photographs to determine where William's withers sat in relation to the dees.  I measured and marked the 8 inches between the dees, and the 17" point to point measurement.  I tried to find the center of both the tree and the horse (within a range) and I traced the horse into the tree.  This tracing is, I believe, a fair representation of the near side point in relation to his side.  You can see when the tree sets down with weight on it, it presses into his side.  The padding of the point is not shown here, and the line of the horse undoubtedly accounts for the fat layer over his ribs.  Granted, the flocking and the pudge are moldable to an extent, and this line drawing does not take into account the ample flocking on the off side which raises the saddle, but by comparing this line drawing what is actually happening on the horse, it does help you understand what is going on under there.


I also brought the 4 foot level to the barn.  While the saddle appeared to sit more level than this, (and when mounted, my weight did set the front of the saddle down further) you can see here that this saddle sat more uphill on him than my Martin and Martin did.

In the end, after consulting with both Linda and Sue, and sleeping on it, I decided to let this saddle go.  Yes, the fit probably could have been improved with adjustments to the flocking by a skilled fitter.  Yes, there is something to be said for finding the perfect match for your own figure and hoping to find a horse to fit under you.  But, this is the horse I have now, and I would have had to make the basic adjustments to the flocking myself.

The right saddle for us is out there somewhere.  The treasure hunt continues.


Thursday, August 16, 2012

Mayhew Ride #2 Fit Frustrations

I spent a lot of time today examining the fit of the saddle, before, during and after my ride, and took dozens of photos.  I have sent those to Linda Flemmer along with my questions, and will wait until after she and I have been able to discuss my thoughts before I post it all here.  In the comments of my last post she asked me to further explain the "void" I was feeling under the near side.

In my previous post The Wisdom of Wither Tracings, I showed the wither tracing comparisons that Sue Tobin of Side Saddle Heaven did for me to illustrate the process of comparing a wither tracing to a potential match.


In this example, the near side point of the tree is too curved for the rib cage of the horse.  This elevates the near side, shifting the saddle towards the off side.  You can see the negative space between the line representing the horse, and the lines representing the trees.


Here is a close up of the pressure point.

Now you would think that raising the near side and shifting the saddle towards the off side would help keep you from rolling left.  Not so.  What it does, is raise the center of gravity, destabilise the load, and when there is movement, shift it in the direction of the most weight, which is... roll the saddle to the near side.  In fact, as soon as you put weight on it, the saddle is going to fill that void, collapsing and rolling left.


This Lissadell, is well flocked on the off side.  And honestly, I can find no voids or pressure points on the off panel.  It appears to be a good fit.  The less flocked near side, shown above, creates a void between the flocking and the horse.  But there is more to it than that.


When viewed from the rear, you can see how the saddle is perching on the point and that the curve of the saddle is sitting above the curve of the horse.  The near side point is in contact with his ribs.  When I am seated, my weight settles the saddle and this void is not visually apparent.  My concern is that this is not a fit issue that can be solved by flocking the near side or deflocking the off side.

Which will be a real shame because I can say, that sitting in this saddle, and feeling the differences between it and my Martin and Martin is nothing short of a revelation.  It is so comfortable to me.  If this saddle does not work out, that experience alone has been worth the price of admission.

Wednesday, August 15, 2012

The Mayhew Lissadell


This lovely saddle arrived safe and sound on yesterday.  Today, I took it to the barn to try on William.  I was so nervous working up to this.  Will this saddle fit?  How well will it fit?  What will it feel like?  What adjustments will have to be made?  I had myself all worked up.  At least this time I am familiar enough with side saddles to not be so intimidated by all the straps, and I have a whole duffel bag of gear from girths to pads to vetwrap.  I feel fairly well equipped. This saddle seems much more compact, lighter, and easier to tote around (in and out of doors especially) which somehow makes it seem less intimidating or less of a production, and more normal.


I forgot to bring a 4 foot level, but the saddle seems to fit fairly level.  Perhaps a touch up hill, but the level is in my car now so we'll find out for sure tomorrow.


My main concern, after the challenges of the Martin and Martin, is getting a tree which is well sprung enough to fit down on his withers well and not leave the saddle sitting too high and top heavy inviting it to spin to the near side.  Linda warned me that this saddle is very fully flocked on the off side (which is to balance the additional stuffing you need under your left seat bone) but that it is something I may be able to remove myself.  It is noticeably fuller on the off side than the near.  I can slip my hand under the near side and feel a bit of a "void" in the area behind his shoulder blade.  I ran my hand all along the front edge, paying special attention to the near side point.  It is snug, but in my judgement, not more snug at the point than along the whole of the front edge.


After longeing and riding (briefly) the saddle seems to sit down better.  I will take more photos tomorrow after riding.


There is still a lot of clearance at the cut back and down the entire gullet.  I worry it may be a bit much since I have little to compare it to.


The saddle is very comfortable for me.  As you will note, my balance strap needs to be snugged up.  Today I had limited time and did not get out of a walk so it was not a problem.  The seat is 23" long by 14" wide and seems to fit the "footprint" of my butt quite nicely.  The position of the upright pommel feels much more natural to my right leg, and the leaping head is a perfect fit to my left thigh.

So that's the preliminary results of the first trying on.  I will go through it all again and see if I can get any better photos.  Please let me know your opinions as this saddle is subject to a brief trial period and if it looks to be completely unworkable, it can be returned.

Wednesday, August 8, 2012

The Side Saddle Adventure Part II

Well, it's been a long time since I last blogged.  Almost eight months.  I'll bet you thought I had lost heart!

Last September, after a particularly awkward and discouraging ride, I realised that I was wasting my time with my Martin and Martin as it just simply didn't fit my horse or me very well.  I mulled it over for awhile, and in the end of October, I sent it on it's way to the Side Saddlery on consignment.  Linda Flemmer gave me an honest appraisal of it and even after her consignment commission, I would be getting more back on the saddle than I was prepared to take.

Sending it to an expert on consignment proved to be the correct decision and by February it was sold.  In fact, I ended up with almost all of my initial investment back, and the price of the experience was only the freight in purchasing the saddle and then sending it to her on consignment.  Furthermore, I am confident that the purchaser was well guided in selecting and fitting the saddle and that it will have good care.  That is always a consideration when dealing with these lovely old maker saddles.

Months wore on and I saved my pennies.  Well, I spent most of my money on horses and wine... the rest of it I just wasted.  I remained in touch with the other passionate side saddle lovers through our fabulous Facebook group, but not having a saddle to work with was very disheartening.  Now and then I would check the classifieds, but I did not muster the determination to start again.  I did not scour the countryside, nor did I actively send out inquiries.  I watched as others posted news of exciting purchases and their hopes and dreams and I waited. 

Then, I saw a nice Mayhew Lissadell come up for consignment.  http://sidesaddle.com/store/saddles/saddle_page/mayhew_9.html  I went ahead and inquired, took a brand new Wither Tracing and sent it to Linda.  There was not a great deal of difference between the one from last fall, and the current one.  Just a little more dip in the pocket right behind his shoulder blades.  Linda confirmed that this saddle tree appears to be a good basic size and shape for Grey, and the 23" length, and generous 14" width sound promising for me.

Keep your fingers crossed.  Taking the plunge purchasing a side saddle is a little easier this time, because I know a little more, and I know that quality old name saddles, especially larger ones, hold their value and that I am spending mostly freight and consignment fees each time I purchase another one.  That reduces the risk as long as you work with ethical and experienced people, which I am confident Linda is.

But at the same time, there is trepidation... will it fit?  Will we all three be compatible?  Will everybody be happy?  What new, unconquered challenges will this one pose? I am not eager to have another "not quite right" saddle sitting in my living room staring at me accusingly saying "This whole idea of yours is nothing but folly".  "Your thighs and your horse are far too unique a combination to ever hope of finding just the right match".  "These old saddles were custom made for upper class women with a larger disposable income than you have."  ....And on and on and on... and they never shut up. 

So, this saddle is coming on trial.  Linda's policy allows a test ride with a full refund of the saddle price upon its return in the same condition within 7 days.  Yes, you do have to pay for the shipping and insurance each way.  And no, it is not easy to get a box the size of a side saddle into the car to take it to the UPS to return it.  But this is the price we pay for passion.  Send good thoughts our way!