Showing posts with label Saddle Shopping. Show all posts

Wednesday, January 9, 2013

Selling a Side Saddle

One thing I've learned in my search for a saddle is that not everyone selling a saddle knows what a buyer might be looking for.  Trust me, if you are selling a saddle, "long seat" and "wide tree" are not going to satisfy my inquiries.  I need the best actual measurements I can get.  With the nearside long point the SHAPE of the tree is every bit as important as the WIDTH of the tree.  And the only way you can even begin to make an educated guess at what that might be, you have to start with some measurements.

 A high percentage of saddle shopping takes place long distance either by email or phone and often with several time zones, and ocean, and cultural barriers in between.  Communication issues will arise.  So, in the interest of buyers and sellers everywhere, both educated and inexperienced, I thought I would put out a few tips of what I need to know with photos to improve my communication options.  It is also important to know if the measurements are being made in centimeters or inches.


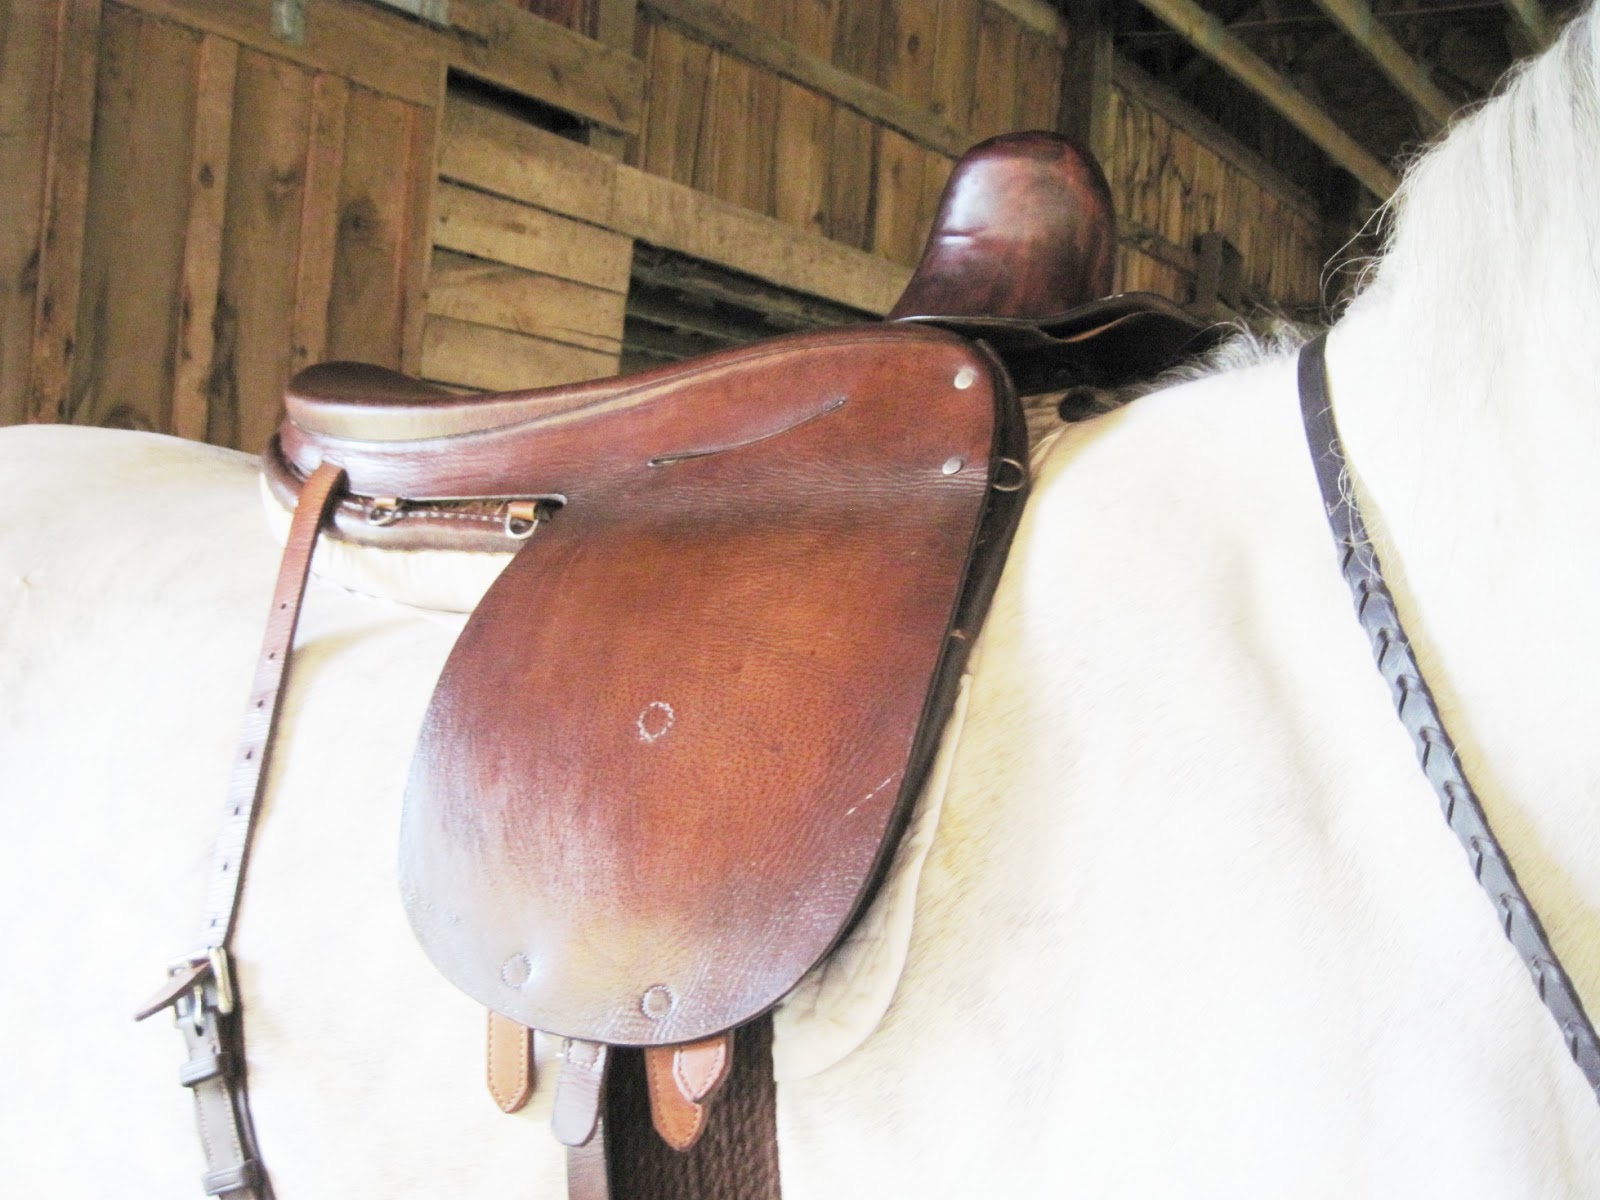
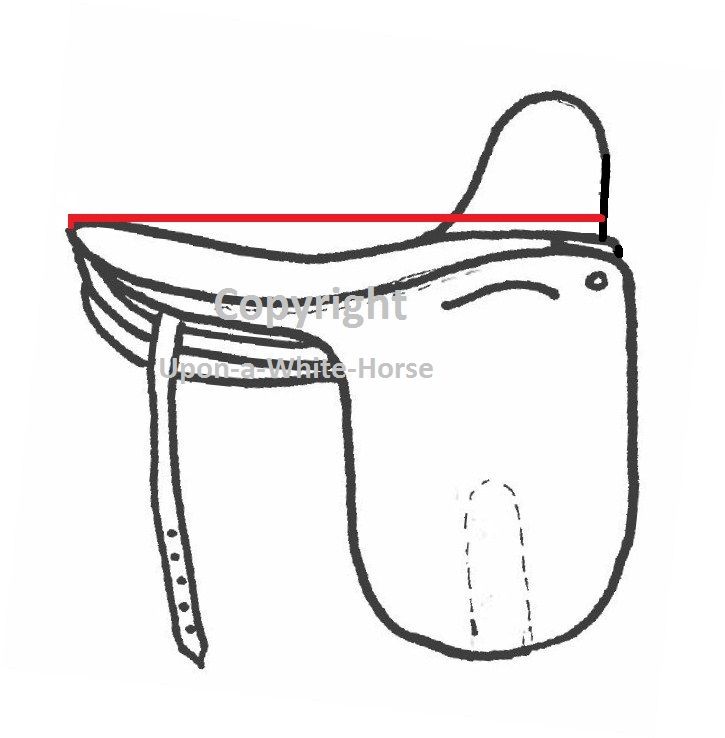
1. Length of seat, in inches. From the front of the fixed pommel to the center of the cantle. This is the American method of measuring. The English method involves the measurement from the cutback to cantle, but even the English will admit that the American method is more practical when matching to a rider measurement.
Most saddles seem to be around 21" to 21.5". So we'll consider that an "average" size seat. Taller riders, 5'8" and up, with longer legs, will be shopping in the 22" to 23" length. These saddles are harder to find and come at a premium. Demand exceeds supply. A nice quality longer saddle with a corresponding wide tree to accomadate the taller lady's larger horse may run as much as $1000 more than an otherwise identical saddle of a standard length.
The more petite ladies, 5'5" and under, will be looking for the 19" and 20" saddles. These are also harder to find.


2.  Width of seat at the widest point.  This can be anything from an average 12" to 14".  Generally, the longer saddles (22" to 23") will run in 13" to 14" width to accomadate the wider frame of a taller woman, and does not necessarily correspond with gullet width.  The smaller saddles may have a width around 11".  The width of the seat is designed to put one seat bone on each side of the horse's spine, and no, they don't come in extra extra wide to accomadate "middle aged spread" of fanny.  The seat bone measurement is what we are trying to fit, not the fanny spread, although if the width of the saddle minimizes the appearance of the fanny spread, that is a plus!  The saddle may fit the pelvis, but if fat hangs over, it will appear that your saddle is too small.

3.  Gullet width determined by Dee to Dee measurement.  This is not a praticularly helpful measurement as dee rings can be installed at varying points on the tree, but it does help put things into perspective.  If you have a narrow gullet (short Dee to Dee measurement) and a wide Point to Point, you can expect the curve of the saddle to be markedly different than if you have a wide gullet and a short Point to Point.  For an example, go to the NEA Saddle Fitting page and scroll down to Tree and Gullet Width.

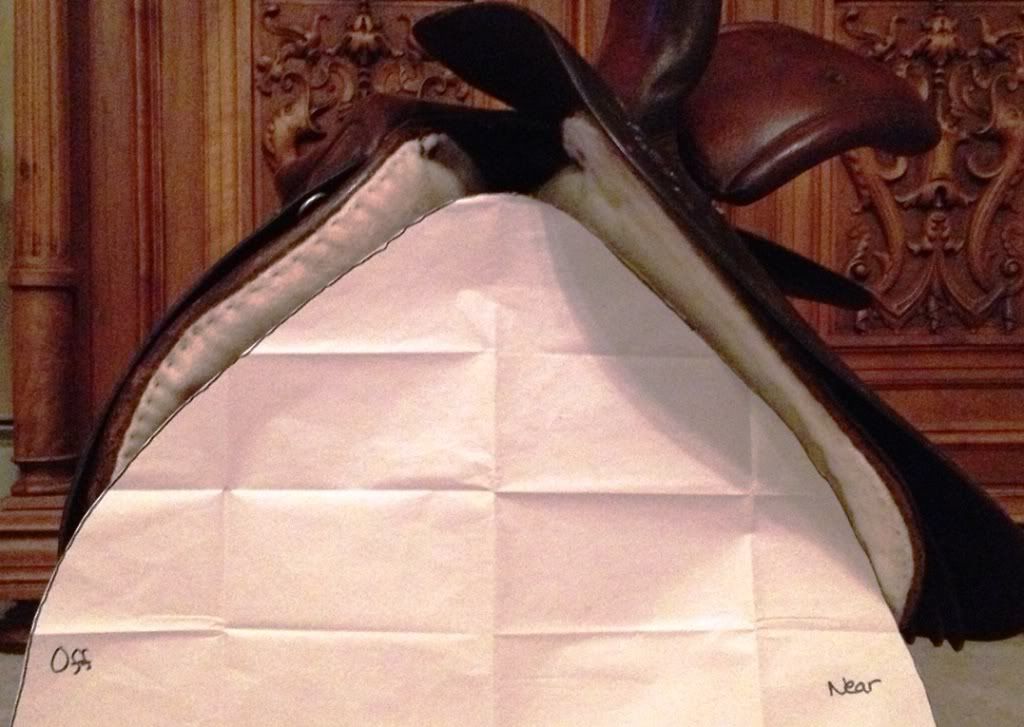
4.  Point to Point Measurement.  This seems to be the most difficult measurement for people because with some saddles you really have to struggle with the safe to find an accurate point to measure from.  The idea is to estimate the measurement from the inside of the tree surface on the off side point, to the inside tree surface of the near side point.  It is NOT the measurement from the inside of the padding, and can be hard to achieve on some saddles.

On the Lissadell saddle pictured above left, I have hightlighted the points, easily visible in their leather pockets.

A narrower measurement will be 16" or so.  A wider horse will be shopping in the 17"-18" range, but a lot depends on the curve of the point.


CORRECT location of Point to Point Measurement from
tip of off side tree point to tip of near side tree point

INCORRECT from off side point to edge of safe
INCORRECT from surface of off side panel to edge of safe
INCORRECT from edge of off side flap to edge of safe

What else I will want to see:

A clear photo of the front of the saddle so I can see the overall shape of the tree and padding for myself.   From this I can tell how much flocking is present and whether the saddle has been flocked heavily to fit a wider tree to a narrower horse.

This diagram shows two saddles with identical trees.  The one on the left has been flocked to try to fit a wider tree to a narrower horse.  This gives it a more defined "neck" to the pommel.  The saddle on the right has less flocking and would fit a round horse better.  I like to think of the difference between the shape of a wishbone and that of a rainbow.  My wide, well sprung horse needs
"less wishbone - more rainbow".


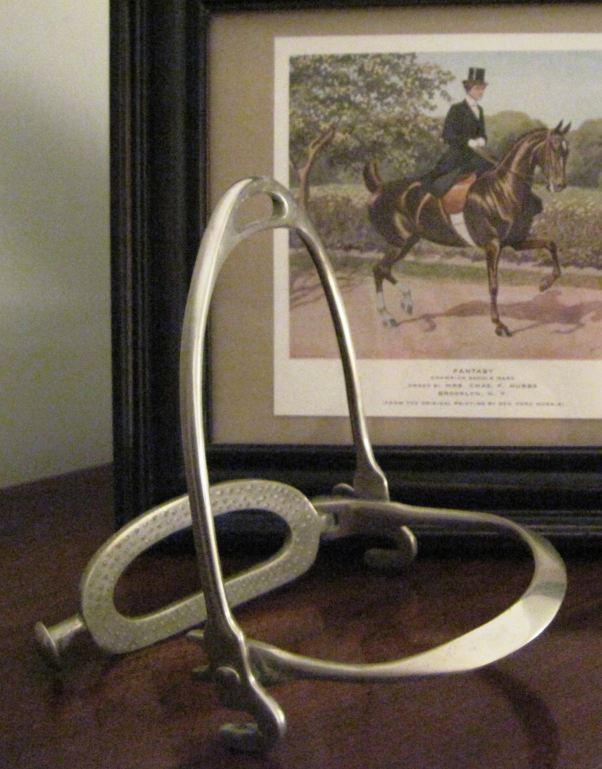
I would also like to see a photo of the underside showing the condition of the panels, photos of the billets on each side, and one of the stirrup fitting or bar on the tree.  It is also important to know what inventory of accessories are being sold with the saddle including the balance strap (with measurement), over girth, stirrup/stirrup leather and fitting, and to get photos of those.  The balance strap may not fit the intended horse, but including these accessories adds to the over all value of the package.  Balance straps are easy to replace, but stirrups and fittings can add up quickly.  Standard, oval eye stirrups are fairly common, but it is always a bonus to get a breakaway stirrup instead.
Up close (and focused) photos of any known imprefections, tears, stains, broken stitching or worn or cracked leather.

I bought this safety stirrup on ebay two years before I bought my first saddle! 
 It still looks great on a shelf.
Once you have found a saddle that you are considering, send a verified wither tracing to have the seller match it up to the saddle.  Of course, it is always best if the seller is experienced with the challenges of fitting saddles, but at the very least, they should be willing to send you a photo of your tracing held up to the outline of the saddle tree so you can judge for yourself.
Here a seller, Carla Peetros, has sent me a photo of William's
tracing against a M&M which appears to be a close match.
Thank you Carla for allowing me to use this photo.


Because of the difficulty of fitting saddles, it is always a plus to be allowed a trial period with return option.  The buyer buys the saddle, and if it does not fit, they can send it back, at their own cost, for a full or partial refund contingent on the saddle being returned in the same condition.  The Side Saddlery offers this policy, and many sellers dealing with larger numbers of saddles will also accommodate this.  Some sellers just need the saddle to be sold and have a need for the cash and may not be willing to do this which is understandable. 

I will say again that the ladies who have been riding aside for any number of years, as well as some of us "newbies" are a very helpful lot.  They want you to be as happy with your saddle as they have been with their's and for it to be a rewarding experience for all involved.  In my search I have met many helpful people and count them among my friends and fellow horse enthusiasts.  Because of this, I have no doubt the discipline will continue to flourish and provide many with an enjoyable hobby for years to come.


Tuesday, August 28, 2012

The Insanity of Wither Tracings

Insanity: doing the same thing over and over again and expecting different results.
~ Albert Einstein
As I soldier on in my search for a side saddle, I decided to revisit the whole wither tracing thing.  I was going to send a tracing off to another source.  I reached into my closet and pulled out the two cardboard cutouts, carefully labeled with the date.  I straightened the little stack, held them up in front of me and was immediately dissatisfied with their differences.  I decided I would make yet another tracing, but as I tried to go to sleep that night, my thoughts were plagued with the difficulties on making an accurate tracing.  What I really wanted, instead of a wire, was a tool like a profile gage that woodworkers use.  But on a grander scale.
When I finally gave up trying to sleep, I logged onto Facebook early in the morning and posed the question to the Side Saddle community., in one form or another "What do you use to make a wither tracing with?"  In the end, I gave up trying to find a 24" wide contour gage, decided to give up on my collection of wires, and I found a 36" artist's curve to order from the internet.  It arrived yesterday and today, after my ride, I spent at least half an hour laboring over a fresh wither tracing.  My stepfather wandered into the barn and together we checked this cutout from every angle.  His verdict "They can't say you didn't try."

So, here is the step by step process of how I took the most accurate wither tracing I could muster.


This is my Stubben Siegfried which fits us both well.  I rode for quite awhile in order to leave a sweat mark of the tree in the proper place for reference purposes.


The proper place for a saddle to sit, is two fingers behind the shoulder blade.

Normally, you would want a helper to lift and extend the horse's front leg so you could see where the Shoulder Blade travels when the horse is in motion.  Because I have just ridden in this saddle, I know that there were at least two fingers width between the blade and the saddle tree at all times.  Here you can see that the shoulder is up against my ring finger, and the sweat mark is to the right of my index finger.

I place my artist's curve (centered) over the withers at the front of the sweat mark.  Notice the girth mark also gives me a reference point.

Now the TRICKY part.  Unless its 10 below and the plastic is cold and rigid, the curve (or wire) is very likely to sag between the horse and the cardboard no matter how careful you are.  See how this curve has closed?  It is important to have the cardboard set up as close to the horse as possible.

Secondly, you want to trace on the correct side of the curve.  This is the WRONG side.

This is the correct side.  Have someone help to hold the curve firmly in place and be careful not to push it with your pen.

Now, cut the shape out of the cardboard and label the Near and Off sides.


And the FRUSTRATING part.  Put the negative space back on the horse to see if it fits.

You may have another go at placing a freshly measured curve against your cut out.  Starting small makes sense because we can continue to whittle away until it fits.

William got used to wearing the cardboard.  You will note that as the horse moves, and the muscles expand and contract, the shape will fit differently.

20 minutes and many shards of cardboard later, the curve is beginning to fit down on the horse properly.

Make sure the board is upright and level across the top.  Check both sides to see that the curve follows the sweat mark down the side.  Identify tight spots and remove them with your scissors.

See the difference between my initial best effort at tracing and the final "verified" shape?  This is due to the curve (or wire) sagging and closing the angle at the withers.  If you didn't verify that the cut out fits, you would be sending erroneous information to your saddle seller, and we all know the old saying "garbage in garbage out".

Now, find some light weight kraft paper to trace the shape onto.  Do not trace the removed peice of cardboard.  Trace the one you tried on the horse.  Label the Near and Off sides clearly and write your name, contact info and date.  Be sure to write all this info on the INSIDE of the curve so that when the shape is cut out to compare to the saddle, the info is not on the scrap.

Here is my short stack of wither tracings.

My most recent tracing, which I sent to Linda Flemmer for the Mayhew, fits fairly well.  It is an advantage to work with a base line tracing that you have compared to an actual saddle and seen where the fit challenges are with that saddle so you can become familiar with your horse's shape.

With the last tracing and today's tracing superimposed on each other, you can see that they are very similar.  I now feel comfortable mailing this tracing off to match against the next candidate.

Thursday, August 16, 2012

Mayhew Ride #2 Fit Frustrations

I spent a lot of time today examining the fit of the saddle, before, during and after my ride, and took dozens of photos.  I have sent those to Linda Flemmer along with my questions, and will wait until after she and I have been able to discuss my thoughts before I post it all here.  In the comments of my last post she asked me to further explain the "void" I was feeling under the near side.

In my previous post The Wisdom of Wither Tracings, I showed the wither tracing comparisons that Sue Tobin of Side Saddle Heaven did for me to illustrate the process of comparing a wither tracing to a potential match.


In this example, the near side point of the tree is too curved for the rib cage of the horse.  This elevates the near side, shifting the saddle towards the off side.  You can see the negative space between the line representing the horse, and the lines representing the trees.


Here is a close up of the pressure point.

Now you would think that raising the near side and shifting the saddle towards the off side would help keep you from rolling left.  Not so.  What it does, is raise the center of gravity, destabilise the load, and when there is movement, shift it in the direction of the most weight, which is... roll the saddle to the near side.  In fact, as soon as you put weight on it, the saddle is going to fill that void, collapsing and rolling left.


This Lissadell, is well flocked on the off side.  And honestly, I can find no voids or pressure points on the off panel.  It appears to be a good fit.  The less flocked near side, shown above, creates a void between the flocking and the horse.  But there is more to it than that.


When viewed from the rear, you can see how the saddle is perching on the point and that the curve of the saddle is sitting above the curve of the horse.  The near side point is in contact with his ribs.  When I am seated, my weight settles the saddle and this void is not visually apparent.  My concern is that this is not a fit issue that can be solved by flocking the near side or deflocking the off side.

Which will be a real shame because I can say, that sitting in this saddle, and feeling the differences between it and my Martin and Martin is nothing short of a revelation.  It is so comfortable to me.  If this saddle does not work out, that experience alone has been worth the price of admission.

Wednesday, August 15, 2012

The Mayhew Lissadell


This lovely saddle arrived safe and sound on yesterday.  Today, I took it to the barn to try on William.  I was so nervous working up to this.  Will this saddle fit?  How well will it fit?  What will it feel like?  What adjustments will have to be made?  I had myself all worked up.  At least this time I am familiar enough with side saddles to not be so intimidated by all the straps, and I have a whole duffel bag of gear from girths to pads to vetwrap.  I feel fairly well equipped. This saddle seems much more compact, lighter, and easier to tote around (in and out of doors especially) which somehow makes it seem less intimidating or less of a production, and more normal.


I forgot to bring a 4 foot level, but the saddle seems to fit fairly level.  Perhaps a touch up hill, but the level is in my car now so we'll find out for sure tomorrow.


My main concern, after the challenges of the Martin and Martin, is getting a tree which is well sprung enough to fit down on his withers well and not leave the saddle sitting too high and top heavy inviting it to spin to the near side.  Linda warned me that this saddle is very fully flocked on the off side (which is to balance the additional stuffing you need under your left seat bone) but that it is something I may be able to remove myself.  It is noticeably fuller on the off side than the near.  I can slip my hand under the near side and feel a bit of a "void" in the area behind his shoulder blade.  I ran my hand all along the front edge, paying special attention to the near side point.  It is snug, but in my judgement, not more snug at the point than along the whole of the front edge.


After longeing and riding (briefly) the saddle seems to sit down better.  I will take more photos tomorrow after riding.


There is still a lot of clearance at the cut back and down the entire gullet.  I worry it may be a bit much since I have little to compare it to.


The saddle is very comfortable for me.  As you will note, my balance strap needs to be snugged up.  Today I had limited time and did not get out of a walk so it was not a problem.  The seat is 23" long by 14" wide and seems to fit the "footprint" of my butt quite nicely.  The position of the upright pommel feels much more natural to my right leg, and the leaping head is a perfect fit to my left thigh.

So that's the preliminary results of the first trying on.  I will go through it all again and see if I can get any better photos.  Please let me know your opinions as this saddle is subject to a brief trial period and if it looks to be completely unworkable, it can be returned.

Wednesday, December 14, 2011

Christmas Shopping

Well you all haven't heard from me for awhile! Fear not, I am not discouraged or put off of riding aside, I am just saddleless at the moment. I am still researching and enjoying all things side saddle.
My family has not exchanged Christmas gifts in years, but we still enjoy a portion of holiday consumerism. We tend to buy things for ourselves instead which isn't a bad system. My husband and I have a route of antique stores that we frequent about every two or three months. Two weeks ago I scored a Royal Worcestershire mug with a hunting scene.
What caught my eye first was the grey horse ridden aside. But I am slow to pick up "dustables" as our house is small and already full.

The back has the first verse and chorus of the hunting song "Do You Ken John Peel" which interested me. but, the final stroke was that when I inspected the signature on the art, it was the same last name as my own. Oh very well! I'll take it.
I was still a bit put out over the cost as I thought $30 was a little much for a hunting mug outside of hunting country. But when I got home and looked on eBay I decided it wasn't out of line.

This past Sunday, I found another piece of Royal Worcestershire in another store. A little pin dish just like this one for $7, but I left it behind. That's $7 that can go into my saddle fund.
Meanwhile, my saddle is on consignment at The Side Saddlery in case any of you want to do some Christmas shopping for yourselves. Linda is great to work with. She is on the lookout for a a saddle that will fit Grey's infamous wither tracing and my long legs.
I've found myself indulging in a bad habit of recent. I'm judging women's fannies in the grocery. Not comparing them to my own so much, as determining whether they would have any better luck than I finding a side saddle to fit. There are some really unfortunate shapes out there, much more challenging than my own. And right now, mine is most challenged my Christmas Cookies which is no one's fault but my own.
So, Merry Christmas everyone. I hope to be more active on this blog come Spring.

Saturday, October 8, 2011

The Wisdom of Wither Tracings


This blog entry has been many weeks in the making. One thing I have to say about the side saddle aficionados. You are all a most helpful and welcoming bunch.
Almost within hours of my posting my hoarder's dilemma entry, where I first spoke of moving on from this saddle to a possibly better fit, I found a very pleasant email in my inbox. It was from Sue Tobin of Side Saddle Heaven. She offered to help me in my search and suggested that perhaps my horse was simply not a Martin and Martin kind of guy.

Our conversation developed over the weeks of my sending a wither tracing, and her sending the results and explanations back. As I endeavored to fully understand the process, Linda Flemmer, from The Side Saddlery, was introduced into the email conversation through a clarification on point to point measurements. These ladies are patiently diligent in their explanations, and I have tried to be a receptive and understanding student. At one point I feared my blog entry may morph into an article, or worse, a whole book. Volumes could be written on saddle fitting. In the context of this blog, I hope, dear readers, to pass on some fundamental information that may be of help to someone just starting out. Someone like me who may have purchased, on a whim, the long dreamt of side saddle, or who is on the verge of doing so. You can read about tree measurements and wither tracings, but sometimes it doesn't sink in until it applies to your own situation.

The average shape of riding horses has changed over the past century. We have bred them larger and the overall shape has evolved over the years. For this reason, it can be hard to fit some of the larger well muscled, or over fed horses we ride today with a saddle designed 75 or a 100 years ago. And also, the principles of saddle fit have evolved. We all probably grew up reading cowboy stories where a well trained horse was easily distinguished by patches of white hair grown back from saddle rubs. That sort of horsemanship doesn't fly in this day and age. Heck, we now have equine dentists, chiropractors, and professional saddle fitters. Show up with a horse with rubbed hair, a girth gall, saddle sore or **gasp** fistulus withers, and see what kind of looks you get!

So, if you are new to side saddles, not an expert on saddle fitting, and don't have an expert within easy distance with a selection of saddles to try on... how do you be sure that tab A will insert into slot B? In other words...


How do you know that THIS...


...will fit into THIS?

Above is a diagram of a bare side saddle tree from the front, shown with a bare astride tree from the front. The aside tree is an older style tree with a considerably longer near side point for illustrative purposes. Click here for a series of photos on the ISSO site showing a bare Whippy tree with a bit shorter near side point.

Enter the Wither Tracing.

For starters, you will notice that the side saddle tree is built asymmetrically. The near side point extends further down the rib cage in order to stabilize the saddle and counteract the roll. when fitting, not only do you have to measure the gullet width, and the width between the shoulder blades, you have to somehow account for the curvature of your horse. Is he slab sided? Well sprung? Round as a barrel?

This link covers the basics of wither tracings for standard astride saddles.

How to create a Wither Tracing
(**Note: at a later date, I made a blog entry regarding making a "verified" side saddle wither tracing.  Find it here.)

But, like I said, side saddles are more complicated. You can't rely on a simple triangle measurement. Side saddles are typically measured across the gullet from Dee Ring to Dee Ring, and from Point to Point. But the location of the Dees varies from maker to maker, and saddle to saddle. And I think I would have to have a degree in geometry to understand how a diagonal measurement across my horse's barrel could tell me anything useful without knowing a lot of other measurements and angles. I learned to spell the word "hypotenuse" from Sue.


That will get you part way. But how do you take into account the degree of curve of the near side point? You know, the one that keeps your saddle from rolling off? How do you know the saddle tree curve will fit the horse curve? This is a problem that is thankfully absent from astride saddles.


Sue asked me to send her a "verified" wither tracing. Not just any wither tracing. There are two important points you need to be aware of. First is that you need to use a 36" wire to trace the curve of the ribs as far as the near side point will go. So a store bought artist's curve or your standard wire coat hanger will not be long enough. Secondly, after you cut the shape out of your card board, you have to put the scrap of cardboard back on the horse like a saddle to see if you got it right. If you didn't, back to the drawing board.

I always keep the backs of desk pad calenders around and they make great material for this project. When you trace the withers onto your cardboard desk calender back, you want to put the heavy glued spine at the wither tip as this will keep the cutout rigid when you put the negative space cutting back on the horse and you won't be bending it in the middle, rendering your verification pointless. Or, get a sturdy piece of corrugated that is big enough that it won't droop when you cut the horse shape out.

Then you need a long, flexible but stiff piece of wire. I raided my husband's garage for this and came out with some sort of ultra expensive coaxial cable I had to promise to bring back. I also used my artist's curve as a verification that I was not allowing the wire to sag between the horse and the cardboard. The artist's curve does very well at holding it's shape while the 36" wire is unwieldy and harder to manage. I took an initial 18" trace over the top and drew that on the board with pencil. Then I marked the center of the 36" wire with black marker, put that point on the mane line of his withers, and proceeded to shape the wire to the best of your ability. This may take some time.

When I laid the long curve on the board I used the short top tracing from the artist's curve as a guide to make sure my wire hadn't sagged in transit closing the curve like a wish bone. It took more than a couple of tries before I was happy with the curve, and when I placed the cut out scrap over his back I was pretty pleased with my result. Both sides even looked like they belonged to the same horse, and that is hard to do. You will be tempted to cheat, and fold something to duplicate the one good side you think you've drawn but don't. It won't give you an accurate result.


Here is my big, round, well sprung barrel of a horse.


I transferred the form onto mail friendly newsprint paper, marking the near and off side and wrote my full address and William's data as well as the date the tracing was taken, and mailed it off. Then I waited eagerly for the results.


Sue made copies of my wither tracing and superimposed the tree templates she has made from her inventory of saddles, choosing the larger seat sizes which have the best chance of fitting me. She sent me both examples of trees that would fit, and trees that wouldn't. You can see how the trees in the above photo do not sit down on the withers. This will allow the saddle to roll in the direction of the arrow.


Sue's tree template is made by setting the saddle back on it’s fanny, and separating the padded panel extension and the near side flap to expose it’s ‘nether regions’. This enables the her to follow the line of the tree, bending a wire to match, until an accurate representation of the tree itself, without padding, is achieved. Then, she superimposes the tree template over the wither tracing, using her years of experience to judge how this tree would sit on this horse's back.


This is the only long distance method for predicting whether the tree and the horse have a compatible curve. Note the purpley line that ends highest up in this photo. This tree is still curving inward where Grey's ribs are curving outward. This creates a pressure point. That line also happens to represent a Martin & Martin Tree. Guess what I bought? A Martin & Martin.


What you want is a tree like this which is wide and smooth enough to follow the curve of the ribs, as both this Owen and this extra-wide Champion and Wilton tree do. The tree is still curving outward with the horse, and the top of the saddle is settling down over the withers not perching above them.


My saddle's curves are not compatible with my horse's curves. This is easiest to illustrate on the off side garage door hinge. While the hinge is not the tree, the curve must be assumed to be somewhat similar to the near side point. You see where the tip of the hinge hits his ribs? It makes a depression in his fat covering. It rumples his pudge, indicating a pressure point.


This is harder to see on the near side because the safe covers a wider area.


But when I ran my hand ALL the way around the saddle I could clearly feel the pressure point. The tip of the tree pushed down on my knuckles. The rest of the front of the tree, all the way across was comfortable and easy to slide my hand in, but that tip is a problem. Not only is it uncomfortable for the horse, but it prevents the saddle from settling down properly. It is part of my uphill problem. No matter how much flocking is taken out of the pommel, if the hard tree is too tight at any point for the horse, the saddle will not settle or sit straight. And if the saddle will not settle down on the withers, we are going to continue to have the saddle roll to the side.
Not to mention how that must feel when you hang one hundred and mumblemumble pounds of rider on it.
So that is where we are at right now. Regardless of seat length, or flocking issues, the tree of my saddle is not a good fit for my horse. Which means.... it's time to shop!